Tuesday, November 16, 2010

Spring Potato and Egg Salad


Spring Potato and Egg Salad

Ingredients
6 fresh free range farm eggs, hard boiled
handful of fresh chives with flowers
handful of fresh parsley
1 spring onion, finely sliced
1 gherkin, diced into tiny cubes.
1 tbsp capers
2 desiree potatoes, peeled
4 kipfler potatoes, peeled
1 carrot, peeled, halved lengthways and finely sliced
3 tbsp natural greek yoghurt
1 tbsp dijonaise

Method
Boil potatoes in salted water till just done but remain firm (not soft). Set aside to steam off.
Cut boiled eggs into quarters.
Dice the potatoes into chunks.
Finely chop the parsley and chives and add half to the yoghurt and dijonaise. Season.
Mix the potatoes into the dressing with the other ingredients.
Scatter the eggs on top and the remaining herbs.
Season with Pepper.
Garnish with chive flowers.

Monday, November 15, 2010

Wedding Breads

 
Eliza and Paul had a wonderful wedding on a lovely farm called Oxley Downs just south of Dubbo. There was a salt ceremony that gave reference to 'the salt of the earth', and as each partner put grains of salt into each others bird cup, the grains are joined for eternity.

A long time ago salt salt was a very important and valued commodity (especially before refridgeration). Salt is essential in bread as it preserves and adds flavour to the final meal. This was referred to by the celebrant who added that its always good to have spice in your life and that salt is a symbol of preservation in marriage.
 

Oxley downs is a wonderful farm run by Liz and Scott Tourle. They have an amazing vegetable garden full of the seasonal greens of spring, and many strawberries.

I made some breads for the wedding between Eliza and Paul, and I decided to make different flavoured breads to symbolise the complexity but also the joy of marriage; sweet sundried tomato and brown sugar foccacia, fruity sourdough, savoury baguettes, soft olive oil ciabatta, and wheat wreaths for health and prosperity.


 For the baguettes, wreaths, wheat sticks and pretzel shaped breads I used White Semi-sourdough dough.

The recipe for the Potato, Garlic and Herb Sourdough is here on this website.
Also there was White Sourdough with a variety of seeds for toppings.
See also the Foccacia recipe and the Ciabatta recipe.

This cool kid liked the Foccacia.

Foccacia

Foccacia

Ingredients:
600g strong plain flour
13g fresh yeast or 7g dried yeast
400ml warm water
20ml olive oil
20ml milk
15g salt

Method:
mix
knead for 10 minutes
rest 10 minutes
place dough in oiled container covered with plastic and prove for 1.5 hours.
Every 30 minutes turn out the dough, press into a rectangle, fold one third over onto itself and then the other third over that. Turn 90 degrees and repeat. Place back into container.

Preheat oven to 180 degrees C.
Halve the dough. Press out on well floured baking trays and prove covered for 15 minutes.
Add toppings and sink fingertips into the dough to create the dimpled effect and catch some of the topping.
Prove for further 15 minutes.
Slide into oven and bake for 25-30 minutes.

 I used basil pesto and sundried tomato, pine nut and brown sugar toppings.

River Cottage Ciabatta

Ciabatta
This recipe comes from my River Cottage Bread Book. I have improved my knowledge and technique for making this bread after a long process of practice and research - looking at books and online websites and forums for tips and tricks. I have found the Sourdough Companion, and the Wild Yeast websites really useful. One common thing I read is that people take a few loaves, or a few dozen loaves, to get things right with making their own bread they are happy with and that isnt unpredictable anymore.

If you enjoy making bread you will go a long way fast. There are many ways to get advice too. I was impressed that on some of the online forums people post pictures of a cross-section of their loaves and get a diagnosis by the pros (artisan bakers and home bakers that subscribe to the forum) as to the quality of the bread. It is amazing that these people can look at the number and size of the air bubbles, the crust and crumb, the stodgyness of the lower bottom crust, and the shape of the loaves among other things which enables them to give precise advice about where and how the amateur baker might have gone astray. This can range from too long or short proving time to not enough water or too much or too little kneading, as well as the level of activity of the wild yeast starter used.
Below are two identical pieces of dough that were proved supported by linen cloth. The difference is that I rolled one over (and therefore upside down) onto the rimless baking tray (makeshift peel), and the other (at the front) was picked up with my hands and placed the same way up on the tray. As you can see it was deflated by my handling, and I was really gentle.
I had the same problem last time I made this bread and I resorted to just proving on baking trays after that. However proving with support (on linen) really makes a nicer loaf I think. I have decided that the rolling action works well, as can be seen by the following picture. The corresponding two loaves are on the bottom left hand corner of the image, and you can see the stark comparison.

When I cut them, the deflated one was dense and not spongy, and the air bubbles were really small. The rest of the loaves were wonderful and had large holes and wonderful spongy airy texture (see below).


Ingredients
750g strong white flour
250g semolina flour (I used Duralina)
10g powdered dried yeast
25g fine salt
800ml warm water
1 tbsp extra virgin olive oil


Method
Mix all ingredients except the salt together and autolyse for 10 minutes.
Add the salt and stretch and fold it in to combine.
Bulk prove for 3 hours, stretching and folding at each 30 minute intervals. This gives structure to the gluten.
Stretching and folding will get easier as the gluten develops. Try wetting your hands with water before doing it (or olive oil) so they are slippery, not dry with flour. You dont want to add any more flour to this wet dough.

After the bulk prove, turn out onto a bench dusted with semolina and divide into six even portions.
Make the portions rectangles when cutting.
Lightly degas by pressing each piece all over then fold over from the long side to create a loaf that is 4 times long as it is wide. Place on floured linen cloth to prove until doubled in size.
Alternatively, place on a baking tray dusted with semolina (to avoid sticking) and cover with a plastic bag.

Preheat the oven to full.
Gently roll each loaf onto a peel or rimless tray/board from the linen so they are upside down (this evens out the bubbles).  Slide onto baking stone and spray oven with water.
The baking stone adds fierce heat form below instantly to make the bubbles there rise and assure a good texture. It is not essential however, and if you have a thin baking tray the loaves should rise okay.
Bake for 10 minutes on full, then at 200degC for 15 minutes.

Cool completely (at least 30 minutes) before slicing, otherwise it will be doughey and sticky. You must let it continue to cook while it cools this way.

Serve with extra virgin olive oil (I use a lemon myrtle olive oil for dipping in dukkah).

These rolls also go well with a salad dinner in summer or a winter stew or a soup or even for lunch with air dried tomatoes and salami or for breakfast lik e the other day when we had an omlette to go on our long car trip....

Roast Potato, Garlic and Herb Sourdough

Roast Potato, Garlic and Herb Sourdough

Once I had made a few loaves of Sourdough, I decided to use some additional ingredients to make a special loaf for a wedding last weekend. Dan had made a potato gratin the night before, so I used the extra raw potatoes and roasted them in the oven with rosemary and garlic till they were half cooked. This way of preparing the extra ingredients allows the potato to lose some moisture but since it isnt fully cooked it does not disintegrate when folded into the sourdough dough.


Ingredients
800g white sourdough dough
1/2 cup potato in 1.5cm cubes
1 garlic clove, finely chopped
2 sprigs rosemary, finely chopped
1 tbsp olive oil

Method:
Preheat oven to 200 degrees C
Combine the potato cubes, rosemary, garlic and olive oil in a small bowl and toss together.
Season with salt and pepper, then put in oven on a tray and roast for 10-15 minutes until cooked but still firm to the touch (not powdery). Allow to cool.

Fold the potato into the sourdough dough once it has finished its final prove before being placed in the fridge overnight. Shape the dough into a round loaf and place seam side up into a proving basket or colander or any round basket or bowl you have at hand. Put in fridge overnight for 8-10 hours.

The next morning, remove from fridge and place in a warm area to prove until the dough bounces back at a slight indentation with your finger. This took my dough 3.5 hours. The books say anywhere between 1-4 hours for typical sourdough prove out of the fridge, and this depends on the humidity and temperature of your room. Apparently about 22-24 degrees C is a good temperature to prove this dough. I check on the dough and if it is noticeably expanding after 30 minutes I preheat my oven to full because I anticipate it will be ready to bake within an hour.

Once ready to bake, upturn onto a peel or rimless baking tray, spray the top with water and place a parsley leaf on top, then dust with rye or plain flour. Slash the sides to create a square in the middle.
Slide onto a baking stone in the oven.
Spray the oven with water and add some icecubes to a tray in the bottom to let off more steam.
Bake for 20 minutes then check and turn if you have hotspots in the oven. Bake for approx 15 more minutes.

Allow to cool completely before slicing.


White Sourdough

White Sourdough

Ingredients
765g plain flour (preferably organic, though I used Laucke's bakers flour)
400ml lukewarm water
20g finely ground sea salt

Method:
Mix all ingredients except the salt together and stretch and fold/knead for 10 minutes.
Cover and rest for 20 minutes.
Sprinkle the salt over and knead for 15-20 minutes till smooth and elastic.
Cover and rest for 1 hour at ambient room temperature (approx 21degC).

Turn out onto a bench and lightly press into a rectangle. Fold one end 1/3 back onto itself and the other end over that. Turn 90 degrees and repeat. Prove for a further hour covered.

Divide the dough into two or three even sized portions and shape into the loaves you want.
Place in a floured proving basket or makeshift container with a floured teatowel seam side up, or on a baking tray seam side down, covered. Leave for 30 minutes then place in the fridge overnight for 8-12 hours.

The next morning, remove the loaves from fridge and place in a warm spot (approx 25degC) to warm up.
Preheat the oven to full.

When the loaves spring back with a light poke they are proved - this could take 1-4 hours.
My loaves took 3 hours to prove even though it was quite warm (~25degC). I suspect this might have been due to my starter not being as active as I had hoped. Dote on your starter!**
Slash the loaves and slide onto a baking stone while spraying the oven with water.

Add icecubes to a tray in the bottom to create more steam.
Bake for 20 minutes then turn the loaves and bake for another 10 minutes until the loaves have a crust to your liking and sound hollow when tapped on the bottom.

Allow to cool completely before slicing.


Another loaf I made for the wedding with chia, quinoa, linseed and sesame seeds.

White Semi-sourdough Bread

I used one quantity of semi-sourdough dough from the Bourke Street Bakery cookbook to make these baguettes, wreaths and knot rolls.

White Semi-sourdough

Ingredients:
540g white sourdough starter
680g white bakers flour
275ml water
5g dried yeast or 10g fresh
12g sea salt

Method:
Combine all ingredients except the salt and form a dough ball.
Turn out onto floured bench and knead for 10 minutes.
Cover with plastic and rest for 20 minutes.
Press out to a rectangle, scatter over salt and then roll up and knead for 5 minutes.
Rest for 10 minutes, covered.
Knead for a further 5 minutes until you can create a window with the dough.

Divide the dough into seven even sized portions, form into balls and rest covered 20 minutes.
Preheat oven to full.

Flatten each piece into a rectangle double its width in length. Fold one end over a third onto itself and the other end over the first fold so you have another smaller rectangle with the seam facing you.
'Crimp' the dough along the long side folding it towards you. Do this about three times to make a long baguette, then roll out to create more length, about 25cm long. See shaping baguettes here.

Place on floured linen cloth seam side up and prove for 30 minutes until dough springs back when lightly poked.
Roll onto a peel or rimless baking tray so they are seam side down and slash with a sharp knife.
Slash either diagonally across the width about 6 times along the length, or slice the baguette every 5cm almost all the way through to create a wreath: then fold over every second portion of dough (see picture below).
Make any other shapes you like.


Slide onto baking stone and spray oven with water.
Bake for 15 minutes then turn around and further bake 10-15minutes till golden brown.


White Chia Sourdough

White Chia Sourdough

This recipe is inspired by Shao-Ping's Pain au Levain with Chia Seeds from the Sourdough Companion website. The recipe is the same, except I used my white sourdough starter.

It turned out wonderfully. Shao-Ping is very good at describing the process.
You may be able to tell...I cut the bread while it was warm...I just could not wait! I had two other loaves so I felt I could be naughty and slice a nice thick hot bit, even though it was a tiny bit sticky still I love hot bread.


Artichokes from Oxley Downs

Grilled Artichokes

Cut the tops off the artichokes about 1/2 way down.
These pictures should do most of the explaining.
Peel off the hard outer leaves till the inner core is reached (see below).
Rub with lemon and then soak in a bowl with lemon juice added.
Simmer in garlic and chicken or vegetable stock that comes up their sides halfway.
The artichokes should be ready once the stock is completely evapourated. Serve as a side with grains and other vegetables and BBQ meats.

Chicken Carbonara (w/ Spinach and Garlic Fettucini)

Chicken Carbonara w/ Spinach and Garlic Fettucini


Ingredients
1 tbsp olive oil
1 clove garlic, crushed
1 chicken breast diced into 2cm chunks
Mulga smoked bacon, 2 x 0.5cm slices, cut into 1x3cm strips
Proscuitto 2 x 0.5 cm slices, cut into 0.2x1cm strips
2 handfuls button mushrooms, sliced
2 large fresh free range farm eggs, whisked briefly
handful of pecorino pepato finely grated

1/2 cup duralina (durum wheat semolina flour)
1/2 cup tipo '00' flour
1 fresh free range farm egg
Cooked baby spinach leaves, squeezed of juices into a ball the size of an egg.
1 clove garlic, crushed
optional: (+ - 1 egg yolk)

Method

To make the pasta combine the duralina, tipo flour, 1 whole egg, spinach and garlic in a food processor and pulse till crumbs form. Add a little more flour if it is too sticky. Add the extra egg yolk if it is too dry.

Knead briefly into a ball. It should be a firm, mouldable consistency.
Geoff and his pet pasta:
Wrap in plastic and place in fridge for at least 20 minutes. Pour yourself a nice drink, Semillion was our choice.
Meanwhile prepare the other ingredients.

Remove the dough from the fridge. Secure the Pasta Maker and roll out the dough working it through the first setting a few times while repeatedly folding the dough onto itself to create a silky consistency.
Continue to the 7th setting (2 down from the thinnest).
Cut the fettucini yourself with a knife by rolling up the sheet or pass through a fettucini cutter.
Lovely green pasta.
Toss with flour on the bench and set aside.

Heat the olive oil in a pan and saute the garlic and chicken with some salt and pepper. Once browned, add the bacon and proscuitto and cook for 5 minutes. Add the mushrooms and cook till browned.
Bring a pot of water to the boil and salt generously. Add the pasta and stir immediately to stop sticking.
Cook for 5-8 minutes. Dan put in his token 5 minutes of assistance!
Remove with tongs and add to the saute pan. take the pan off the heat and add the two whole eggs. Stir through to cover the pasta. Do not stir too vigorously as the eggs will scramble. This is still nice though, dare I say it.
Add more pepper to taste and serve with a fine grating of pecorino pepato.

Thursday, November 11, 2010

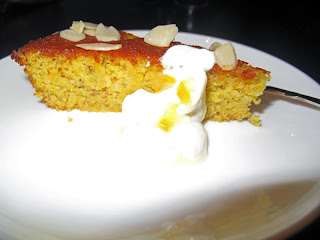
Zesty Citrus, Almond & Hazelnut Cake

Zesty Citrus, Almond and Hazelnut Cake

This is a lovely cake with no butter or milk so its lactose free. Its also really really easy to make, you cant really go wrong with it. I made this with my Mum, Pam, for her birthday and we served it with yoghurt because it just lended itself to that sourish flavour. It is actually now my Mum's and my favourite cake! We might add some cinnamon or cardamom next time though because we love warm spices.
Ingredients:
2 oranges
6 eggs
250g caster sugar
250g almond meal
100g hazelnut meal
1tsp baking powder
Extra caster sugar for dusting before baking
Icing sugar for dusting after baking
Margarine or oil spray (for greasing the pan)


Method:

Wash oranges and place unpeeled, in a pot of boiling water for 2 hours. Drain the water and allow the oranges to cool completely. This can be done ahead of time.

Preheat oven to 190°C.

Break 6 eggs into a mixing bowl or blender. Add caster sugar and beat till light and airy.

Place the two oranges into the egg mix. Break up the oranges and then blend together to a smooth consistency. Blend in the baking powder, lemon zest, almond and hazelnut meal.

Grease a 20 cm silicone baking pan with margarine (or vegetable oil spray) and dust with caster sugar.

Pour batter into the pan and sprinkle caster sugar on top and bake for 1 hour to an hour and a half or until the top is golden brown.

Dust with icing sugar and slivered almonds to serve.

Wholewheat Sourdough

Wholewheat Sourdough

Ingredients (by weight):
210g white sourdough starter 100% hydration
100g Strong Bread Flour
220g Durum wholewheat flour (I used Bellata Gold)
10g natural honey (no additives)
8.2g fine salt
180g water

Method:
Get a bowl or container that will hold more than double the volume of the dough mix.
I made a big ceramic bread bowl to mix my bread in which works well.

Mix all ingredients except the salt and turn out onto a floured bench.
Stretch and Fold or Knead for 5 minutes to bring the dough together.
Autolyse for 20 minutes.
Stretch and fold or knead for 10 minutes.

Note: there appears to be different theories around kneading for bread making, and this has to do with the science of gluten formation. There is an interesting experiment on white sourdough here. I say test out different methods and see what works for you. Bread is a personal thing I think! I like to knead my bread a little, at least to make sure all ingredients are incorporated (eg. seeds, fruit), and it is also really relaxing for me. The higher hydration doughs, such as Ciabatta, are better treated with the stretch and fold technique, and that works well and doesnt allow too much extra flour to be incorporated.


Once the dough is proved, a window can be seen through the dough when gently stretched.
Separate the dough into three portions.
For each portion, press out to a rectangle, fold 1/3 towards the centre and the other third over the top.

Turn the dough so the seam faces you and take the top two corners and fold IN and DOWN towards you.

Then, fold the round part down in the same direction.
Take the whole rounded top part and roll towards you to seal the seam of the bottom fo the batard together.
Use your common sense with this. We need to seal the seam and roll a nice loaf without losing too much air in the dough.

Finished batards - make them your own, they dont need to be perfect.
Find the shape you like and go with that. There is a great video of shaping doughs here.


Once shaped, cover with a plastic bag and place in the fridge overnight to ferment.

In the morning (8-12 hours later), remove the loaves from the fridge and let warm up in an environment that is ideally 25-27 degrees C and 70-85% humidity. To create this environment you could turn your oven on for a bit, then turn it off, then put a bowl of boiling water inside to create higher humidity; then place the loaves on an oven shelf. Then preheat the oven to highest temperature.

Once proved, the loaves should bounce back when pressed with a fingertip. Slash the loaves and put into the oven, spraying with water and adding some icecubes to trays in the bottom to create some steam.

Bake for 20 minutes then turn the loaves and bake for a further 10 minutes or until the bottom on the loaves soudn hollow when tapped. Do not exceed 40 minutes of baking or the loaves will be like rocks.
Results:
My loaves were nice, but under-proved. I think it was the cold temperature in the house. I left them for four hours and they were coming back after pressing a finger in but a small indent still remained. I have since made some White Sourdough where I had a warmer room (warmer day) and they rose really well once out of the fridge, though they were made differently with white flour.

My wholewheat bread was really nice on the first day but it was quite dense. I need to do a bit more researching and practicing so I can work with wholewheat flour and get the results I want. What I want is crunchy crust and moist crumb with more holes in it (more gas from proving and yeast metabolising). So, I want lighter, not too dense.

However....! They were wonderful toasted with dips for the simple fact that they didnt have large holes and thus their density was perfect as a kind of bagel-crisp. I would make them again for this reason because they are chewy and sour and earthy.